


An article that will give you tips and advice on how to "Love Your Home".
Written by Diane Garey
www.dianegareyinteriors.com
"Love Your Home" - (Even When Disaster Strikes) - September 2019
Not long after New Year’s 2019 I received a call from a Grand Island resident who was wintering in Florida. An interior pipe had burst in her Grand Island Home and the brunt of the damage was in the master bedroom and bath. Both rooms had to be totally gutted, a professional mold removal service called in, damaged items inventoried and insurance estimates given to the homeowner for submission.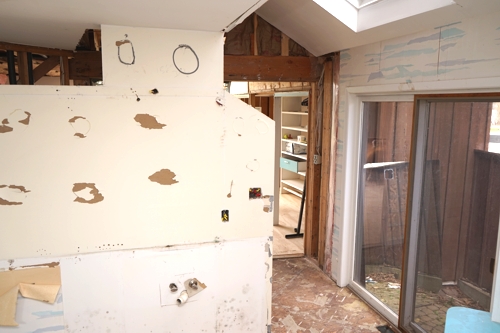
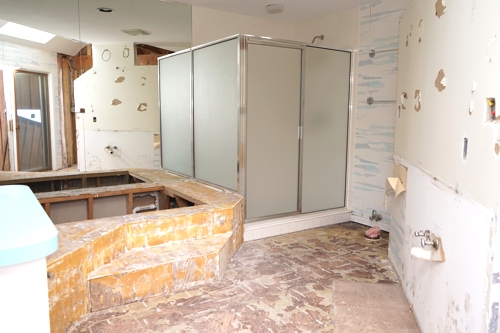
The homeowners’ original request was to recreate the initial design, feeling this was the easiest choice since they could not be in New York to supervise the renovation. However, this design did not optimize the space functionally or aesthetically. The first “before” pic illustrates, even after partial demolition, how the original vanity totally obstructed both the view and the walkway into the bath. “Before” pic #2 shows how the toilet (where the pink installation is) was exposed directly in front of the shower, and how much space the unused jacuzzi required.
I persuaded the homeowners to allow me to present an alternate floor plan...one that would better utilize the space and would showcase materials, colors and textures that would allow us to benefit from this unfortunate event, with a beautiful new master bath.
I began the design process by discussing via long distance with the homeowners their likes and dislikes of the bathroom that we were replacing. This allowed me to come up with a comprehensive floor plan that integrated all of the needed changes, including encasing the commode for privacy and eliminating the rarely used jacuzzi to make room for his-and -her sinks, a vanity and a luxury walk-in shower.
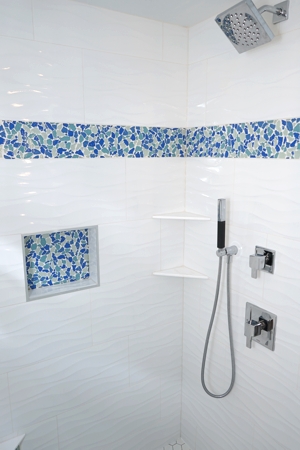
I often do a lot of “back and forth” work with clients electronically-utilizing my computer and cell phone to move the process along in a timely manner. By doing so with this client, I was able to send pics of my vision for the room, based on their likes, dislikes and needs. The wife fell in love with a stunning glass accent tile and we used that as our inspiration for the bathroom.
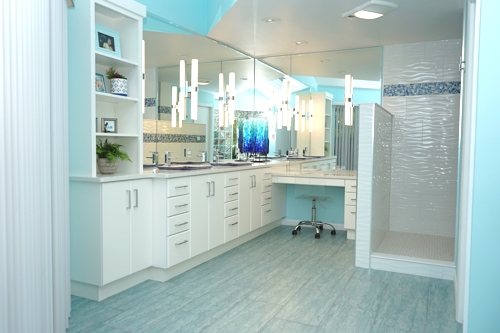
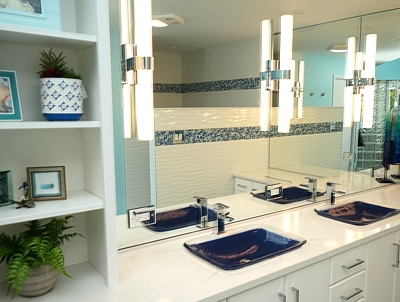
Here are the results of our long distance design project. Contemporary white custom built-ins with luxurious quartz countertops, mirrored walls to accentuate the cathedral ceilings and reflect the beautiful tile, and a stunning walk-in shower. The suite was washed in a palette to reflect the homeowners taste and love of everything aquatic. The results....utter perfection...and the clients are utterly loving their ensuite!
Love Your Home - (Even When the Kids Move Home...Again) - June 2019
The month of June brings forth warm weather and car loads of college students moving back home with their parents. Some of these students will be returning to their campuses in August, others have graduated and have found work in their hometown or are attending grad school there, and are wreaking havoc on their parents’ households as they return to the home nest indefinitely. I will be discussing with you one such family with whom I recently had the pleasure of working with.I met with said client who had a college graduate moving back home to attend graduate school. The family of four was close knit and thrilled to be under one roof again. However, the move was creating a bit of disruption in the household as the graduate was being moved into the family’s home office, which doubled as a playroom for the younger brother, the graduate’s former room was becoming the younger brother’s room and the younger brother’s room would become the new office. The reasons for all of these changes are too numerous to discuss here, but made perfect sense as the homeowners explained them to me.
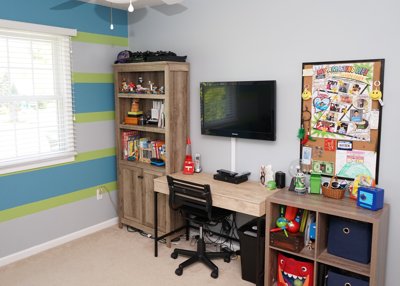
The picture below shows the room I was asked to help redesign and decorate. It had lackluster appeal and had acted as a dumping ground for the older brother as he went back and forth over the past four years. The parents asked that I do something special with this room to entice the younger brother into the move, since he was not excited about changing rooms and was losing his playroom to boot. The new room was small, with most of it taken up by a full size bed.
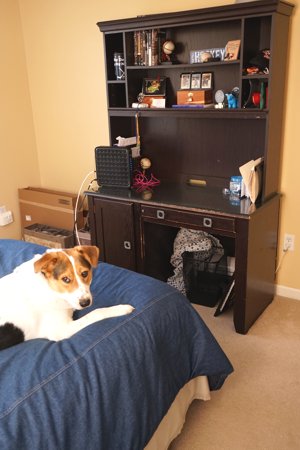
I began with a floor plan for the room which included an industrial daybed placed against the wall to act like a futon. This would give the younger brother floor space to play since he was only 12, and the daybed would act as seating to view the room’s piece de resistance ...an LED wall mounted television so that the younger brother would be able to play with his electronics in his room. What 12 year old would not love that? The floorplan was finished with a bookshelf, desk and some storage cubes to enclose the television almost like an entertainment center, while providing the room’s occupant with functional storage for clothing, school supplies and toys and a place to do his homework.
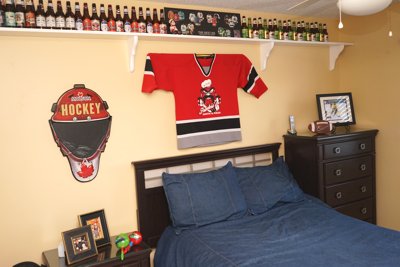
I planned a “WOW” accent wall in some of the boy’s fave colors and added some denim bedding that was comfortable and functional . A shelf above the bed would give him storage for his awards and trophies and some wall decore over the bed paid tribute to the boy’s favorite past time...GAMING (what else?!?)
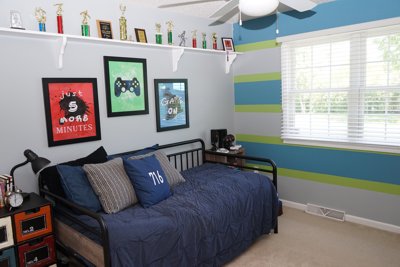
The homeowners and their son are thrilled with the results. The parents are happy to have their college grad back home with them and their other son in a room that he loves, with plenty of space for gaming with friends or sleepovers. They were so happy with the results that we recently finished transforming their new office and older boy’s room. Everyone is happy in their new digs and definitely loving their home!
Love Your Home - Empty Nesters? - March 2019
Many of my clients are newly empty nesters. The kids are finished with college and out on their own, and the homeowners (finally!) have some discretionary income to spend as they wish...on some much needed updates for their home. I met with two such clients recently, and am sharing their story with you.On the initial appointment, the clients took me on a tour of the home. It was a compact tri-level built in the 1960’s, with the original ceramic tile, Berber carpet, trim that was stained that beautiful orangey color from that era, and paneling on the walls in the sun room, living room and the dining room. We discussed the function of each room, which treasured mementos needed to stay, and which pieces they were open to having me move to other rooms in their home or totally get rid of.
The clients’ original request was to replace their weathered and outdated clay tone counter top (“Should we do granite?”) and they wanted me to advise them how to best to spend their money on other updates, for them to enjoy now and to maximize resale value when they decided to sell. The tile floor in the kitchen was a neutral ivory, but the cupboards were an outdated white with oak trim. I made note of this, took some dimensions, contacted my team of tradesmen to get pricing and put together the following plan for the clients.
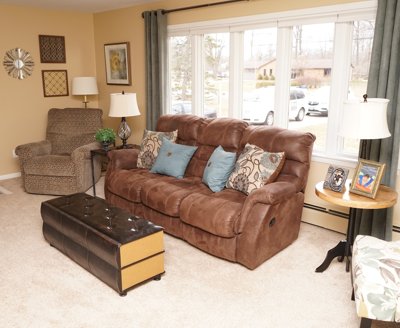
We began by removing the paneling from the sun room, dining room and living room and painting the walls a rich beige paint throughout to bridge the levels of the tri-level home. A crisp white paint for the trim gave the home a more contemporary feel. Adding beige carpeting throughout completed our neutral palette and the clients were ready for me to give their home a new look-using mostly their own furniture!
My first step was to address the dining room. An antique china cabinet and drop leaf table were not only unappealing to the client, they made the small room look out of date and even smaller than it was. I removed the top to the china cabinet and added some artwork to create some visual interest in the room.
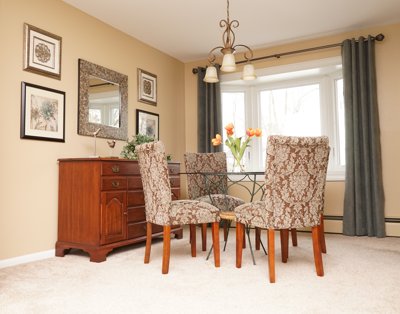
Next, I added some simple, basic drapery panels in the living room and dining room to frame the windows, add visual height to the 7 ½ foot ceilings and give a uniform look to the two rooms. A round glass table I moved from the sun room and some inexpensive parsons chairs in the dining room and some key accessories in the living room completed the look. A great looking room the homeowners now loved and contemporary enough to appeal to any home buyer!
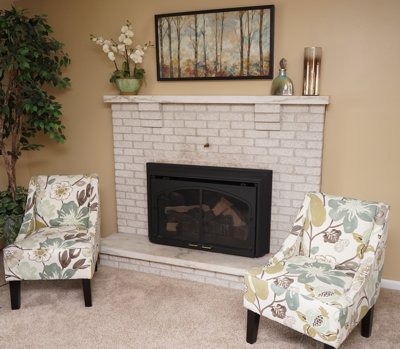
Some new artwork and accessories over the fireplace and some inexpensive chairs for a punch of color to flank the fireplace did the same thing for the living room’s focal point. It is VERY important when working with accessories to find those that are not only the correct feeling for the environment, and appealing for the client, but the correct scale for the space and visual weight to balance with the rest of the room. I find this is one of the things my client really need my direction to accomplish and along with draperies the things that really give any room that WOW factor!
I continued this tactic throughout the house. With the updates, the original tile throughout the house now looked great. The entryway took on a whole new look with a few new accessories and new paint working with the existing tile to create a welcoming environment.
We saved so much money that we were able to do a new builder’s grade kitchen....no granite counter tops, but updated chocolate brown cupboards to replace the outdated 1960’s cupboards and a granite look Formica that was very reasonably priced (pictures when completed). A great new look for my clients at a price they could afford, for a quality that suited their needs and would show great when they decided to sell. They now LOVE their home! Here’s hoping you do as well...and if you don’t, then give me a call:)
Love Your Home In the New Year! - January 2019
Happy 2019! A new year is the perfect time to review our aspirations for our personal and professional lives, as well as our homes...to embrace what is good, and change what does not reflect our personal taste or fit our current needs. I've taken this opportunity to share with you what I consider to be some of the top design trends of 2019, as well as some 2018 trends which are on their way out (or already out!).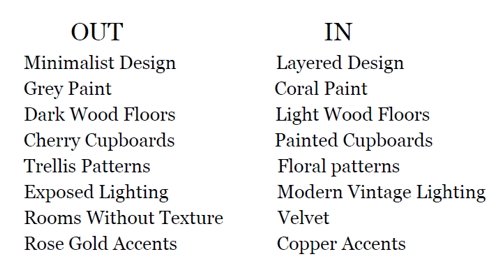
I have always been passionate about mixing decor styles for my clients and not locking them solely into the current trend, unless that is truly their goal and they have the budget to change their room once that trend has run its course.
By mixing and layering different styles I can create a more interesting personalized look for my clients, one that is timeless, that they will love for a long time, that will not look dated any time in the near future.

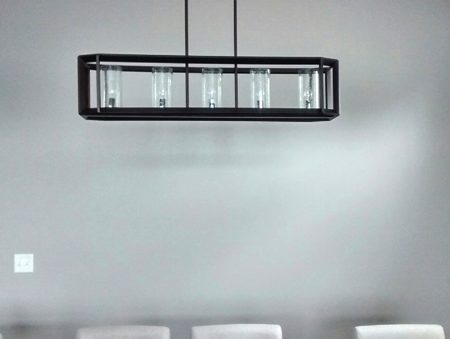
Because of this I am thrilled that one of the current trends for 2019 shows consumers embracing self-expression and mixing some minimalist pieces with some more detailed pieces to truly get a unique look. I also LOVE the idea that the Pantone Color Institute named "Living Coral" their color of the year with a nod to nature's universal emotional response while being unapologetically joyful at it being a traditionally feminine hue. Consumers are growing tired of the sterile grey used in minimalist design and are gravitating to warmer paint colors like "Living Coral" and "pops" of color to create visual interest...whether it comes from a fabulous floral design, great artwork, or a funky velvet sofa.
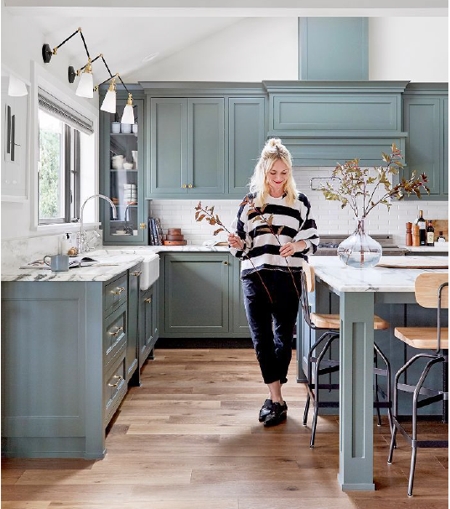
So, according to the trends, 2019 should be a year filled with a softer more ecclectic design...picture green painted cupboards (NOT cherry) with a light wood floor, vintage modern lights, NOT bare edison bulbs, deeper copper accents, NOT bright rose gold, florals NOT stark trellis patterns. This offers so many more ways to express your own personality than the minimalist design that has been popular the last few years...and there is no better way for you to love your home than by doing just that!
Love Your Home for the Holidays! - November 2018
Few things are as magical as the first snowfall of the season. The graceful white flakes falling peacefully from the sky mean the holidays are upon us and it’s time to spruce up our homes for entertaining. Take the stress out of the season with the following tips.*Update one area of your home so you will have that space to enjoy long after the holidays are over. With DGI's help it's not too late.
* For maximum effect, focus on the main areas in your home for seasonal decorating. This will have more impact than tiny holiday accessories throughout the house. Add a festive wreath to your front door and a few large scale planters to your front stoop or a grouping of large scale seasonal accessories to your foyer. Lighted garland on top of your kitchen cupboards and a decorated focal point in your living room will be sure to add to your holiday spirit and WOW your guests.

*Add a great tablescape to your dining room with holiday accessories, seasonal blooms and greenery. Seasonal scents and greenery are great for the bathrooms too!
*Luxurious bedding and shams and decorative pillows in your guest rooms will help your loved ones feel at home and create layers of coziness. Colorful towels and a decorative basket of toiletries will do the same for the guest baths!

Diane Garey Interiors has everything you need to decorate your space so you can focus on family and making holiday memories. From window treatments to tabletops, we have the finishing touches to help you make your holidays stress free. Happy Holidays from our home to yours!
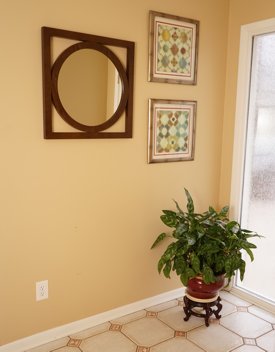
Personalize Your Space - September 2018

One of my favorite parts of my job is helping people with the "finishing touches" like window treatments and accessories. These are the things that personalize one's home and sets it apart from another's. Careful attention needs to be taken to make sure the window treatments and accessories balance with the size and scale of the room and with the furniture that has been selected, as well as balance the color throughout the room and reflect the theme or feeling that the homeowner wants reflected.
I love to shop with my clients. I then can see what catches their eye and what they gravitate to without my input. I want their house to reflect their personalities after all, not mine. The "before”"picture shows a large blank wall in a dining room. Quite often a homeowner will chose to decorate such a wall with a large horizontal piece of artwork . What this actually does is accentuates the large horizontal space. The "after" picture shows how I finished the space.
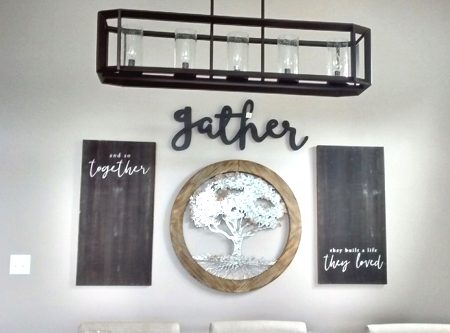
While shopping with my client, she had shown an interest in the family tree accessory. To fit with the theme I added the chalkboard painted vertical pieces with the saying, "And so together they built a life they loved". The dark background was a nice contrast to the light wood and metal in the family tree piece, and balanced with the dark chandelier. To add some softness to all of the straight lines of the pieces, and some height to the accessories, I added the "Gather" script...perfect for a dining room where the family gathers!
Often when I am in a client's home I will quickly sketch out my vision for an awkward area. This helps me to ensure that the client and I are on the same page, and helps me get some dimensions that I might need when shopping. The "before" sketch and "after" picture show how I addressed one such area recently.
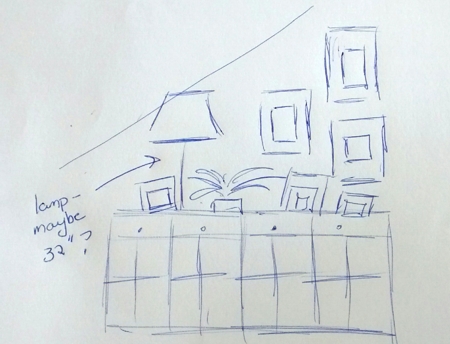
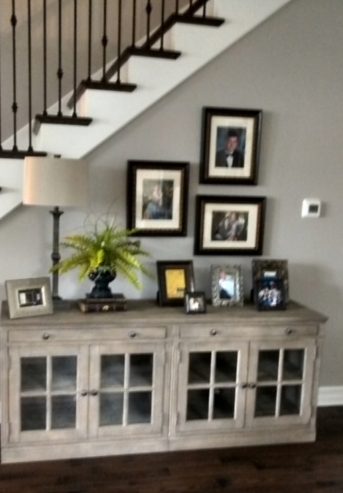
The triangular shape made by the drywall on the side of stairways is a shape that people often find difficult to finish with accessories. As you can see in the sketch, I specifically wanted the lampshade to break the line of the stairway to be high enough to balance with the picture layout I planned for the opposite side of the credenza. I used large enough wall frames to make an impact, added a fern for some softness and neutral color that would not detract from the pictures. An assortment of different frames in different heights finished the area. It looks great and the homeowner loves it!
So, as with any part of your decorating your home, there should be a lot of personal taste reflected in the selection of your finishing steps. However, there are definitely rights and wrongs that need to be considered….especially in regard to the scale and balance of accessories to be used. I hope the above article has helped you in some way, and will guide you as you create a home that you love!
Floor Planning 101 - July 2018
When people ask me what the most common mistake is that I see in my line of work, the answer is simple. People fail to floor plan their rooms before shopping for furniture. They will go out shopping to "get ideas", buy furniture because they "fell in love with it" or because "it was sooo comfy". While all of these are valid reasons for purchasing furniture, without a proper floor plan they will give you pieces that you love, NOT a room that you love. If you want the type of room that you (and others) walk into and think, "WOW", you need to start with a floor plan.
Floor Planning 101 - The first step is to determine the function of the room you are decorating, then create a floor plan that embraces that function. For a formal living room, primarily used for conversation and entertaining I might create a conversation area utilizing the fireplace as a focal point. For a family room, I might create a seating area around a large coffee table for snacking and family game nights, that faces the television for nightly entertainment.
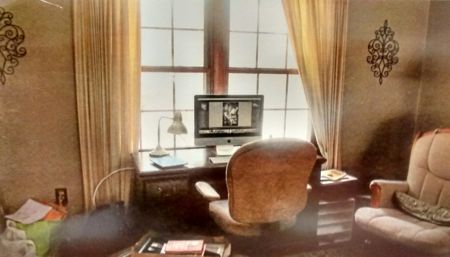
Below is a pix of a customer's home office at our first appointment. It's just a quick pic-not great-that I took on my phone to keep as a visual for myself, but you can tell it's like a lot of home offices. My client had his desk up against the window so he could look outside while he was working. Bookcases and a credenza flanked the adjacent walls, leaving a lot of empty space in the middle of the room. Functional, but nothing special.
I suggested the customer "float" the desk in the middle of the room, an idea he loved because it allowed him to interact with his family in the connecting living room. It also led to an aesthetically much more appealing room. The finished picture below shows what a difference a floor plan makes. Yes, the client did get some new furniture, but it is the floor plan that made all the difference in the world for this project.
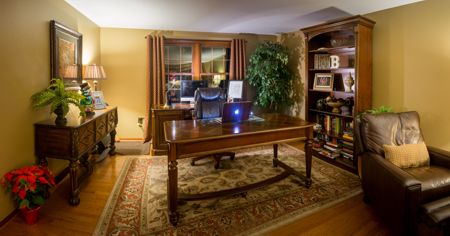
Photo courtesy Aaron Bobeck Photography
So, the lesson is simple, plan first, then shop. And remember, I'm only a phone call away if you get stuck. Call me, I'd love to hear from you and help you...after all, my job is simple...helping you to "Love Your Home!"
Custom Draperies or Ready Made? - May 2018
One of the most common mistakes people make when decorating their homes involves their draperies. Proper window treatments are one of the most effective ways to create a design statement in any room. The right treatment can create balance, give odd window treatments uniformity, control light, give privacy and create visual interest. They can "make a room" by accentuating it's high ceilings, or ruin a room if done incorrectly. To determine whether to suggest custom or ready made draperies to a client I discuss 3 things: budget, timing and quality expectations with that client.
TIMING-If a client needs to spruce up their home before an event they are having in a few weeks, there's nothing like ready made draperies to change the look of a room quickly. However, this is true only if you can use a standard size drapery, which is often difficult, especially when it comes to drapery panels which usually come only in 84" and 95" "lengths, sizes that do NOT accommodate standard windows in most homes, if they are hung properly (more on that later).
QUALITY-Custom draperies are usually far superior in quality than ready made, because they can be tailored to fit the exact length you need and have 2-3 times the fullness of the window they cover, so there is still fullness if they are pulled closed. There are endless fabrics you can choose from that can help you create a statement with pattern, color and texture. They have a quality lining, are weighted so they hang beautifully and don't have the obvious stitching that ready made draperies do.
BUDGET-Because custom draperies use finer fabrics, offer higher quality workmanship and offer more fullness, the price is going to be higher than ready made, where the manufacturers buy fabric and produce in bulk. But when you consider the proper way to hang any draperies, including ready made, the price difference may not be as much as you would think. To get the proper fullness with ready made draperies, I usually have to buy 4-6 panels per window, and sometimes buy the 95" panels and hem them to get the proper length. This adds up and increases the price substantially.
If my client wants a designer look, something unique for their room, or has windows that do not fit standard draperies found in stores, we go with custom draperies. Perfect fabric, perfect workmanship, perfect installation every time! But...if my client has a tight budget or timing parameters and does not mind mass produced draperies, we sometimes have to go with ready made draperies, which I can usually make look so much better than the norm by properly installing them (see illustration).
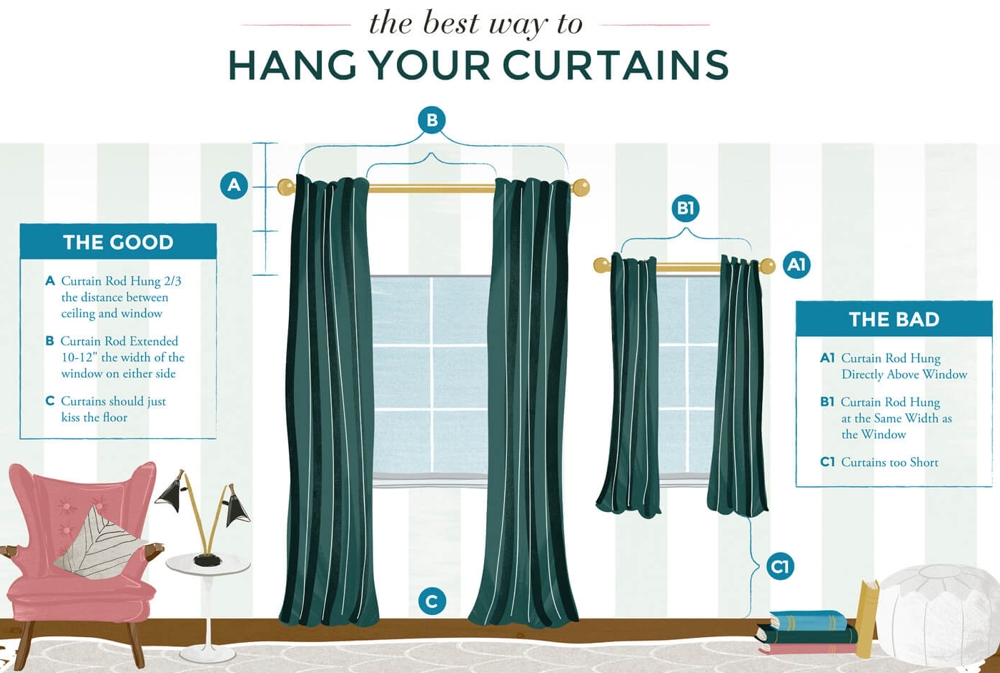
Click illustration for larger view.
The illustration above demonstrates the same window treated 2 different ways. What a difference! The #1 mistake people make when hanging draperies is hanging the hardware improperly. Drapery hardware should be hung as close to the ceiling as possible, NOT on the window trim like our parents used to! A good rule of thumb is to hang the hardware 1/2 - 2/3 the difference between the window and the ceiling, with the panels just touching the floor or 1/4 inch above. Panels should only come into the window a few inches on each side, so take the hardware out 10-12 inches on each side, if possible, keeping the window pane open for viewing and making the window look larger in the process. Valances should also be hung so they come into the window pane only a couple of inches, framing the window, but leaving most of the window open for viewing. What a difference the right treatment and installation makes!
When choosing draperies, as with most design decisions, there is no one correct answer. Depending on your timing, quality and budget parameters, the right decision for you may be either custom or ready made. There are, however, rights and wrongs as to the proportions and installation of the draperies, so take heed. Regardless of your choice, may you and your family be happy with it, in a home that you love!
Spring Spruce Ups to Make You Love Your Home Again - March 2018
Nothing warms a Buffalo native's heart like the first signs of spring. Longer daylight hours, singing birds, as well as newly budding flowers and trees signify it's time to pack up the snow boots, pull out the raincoats and complete our inside "to do" list before the weather turns warm and our attention turns to outside chores.
My first suggestion for spring cleaning is to always clean house windows inside and out. I do this the first warm day that I have a chance to...sometimes not even waiting until spring. There's no better way to brighten your outlook than to wipe away the dirt and grime from the long winter and let the sun shine in. I also love to bring some springtime greenery inside; fresh cut flowers, pussy willows, store bought floor plants or tabletop succulents. Greenery is a great way to add life, form, texture and function to any interior space. Besides the visual impact, greenery purifies the air while muffling noise and helps to create a quiet and peaceful environment.
Next it's time to deep clean those "forgotten areas". The ones you never have time to address like ceiling fans and vents, behind and under furniture, beds and appliances. Vacuum furniture, window treatments and lamp shades, wipe down kitchen cupboards and walls, applying a fresh coat of paint if walls are beyond cleaning. Schedule an appointment to have your carpets professionally cleaned. While cleaning I usually make a mental note of areas I can spruce up with some inexpensive new accessories. A new throw and pillows can update a sofa that has seen better days, new towels in a trendy color can add a fresh new look to a kitchen or bath. I love to relocate accessories from one room to another and can give a room a whole new vibe at minimal to no expense by doing so.
If you have the resources, pick one large scale project to tackle this spring. Remodel that bathroom you've been putting off for years, redecorate your family room or refinish those outdated kitchen cupboards to a stylish white kitchen that you will love, while increasing the resale value of your home. If you are overwhelmed and not sure where to start, call in a professional to help you coordinate things. Hire someone you are comfortable with who is detail oriented and is willing to invest the time with you to provide insights into design and manufacturers and also works well with tradesmen. Someone who will work with you to provide multiple options and knows how to direct you toward choices that make sense to your vision and your budget. This will insure that your finished project will meet or exceed your expectations and your home will be the haven that you deserve...regardless of your budget.
Not long ago I helped a client who had good quality wood cupboards that were outdated. They were honey oak, the countertops a blue formica and the floors the original vinyl. We discussed their vision for their kitchen, as well as budget and timing parameters for the project. The budget did not include granite for counters or new cupboards. The results of the project are pictured below.
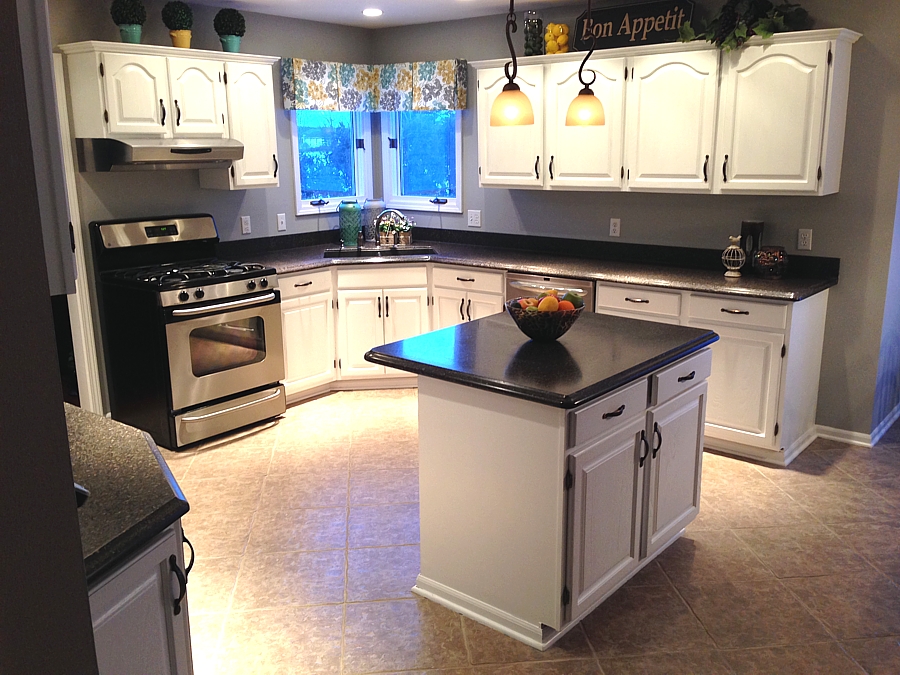
Click photo for larger view.
As you can see the results are beautiful! We transformed the kitchen by painting the existing cupboards white. A ceramic tile floor and formica countertop that looks like granite completed the look. Some reasonably priced accessories, added to the top of the cupboards, gave the room that "WOW" factor. The customers are thrilled. They have the kitchen of their dreams, finished under budget. And it all started as their one large scale project for that spring not too long ago. I wish the same for you.....a happy spring, and a home that you love that is a haven to you and yours!
Tips on Decluttering & Organizing After the Holidays - January 2018
If you're like most people, you've taken down your holiday decorations by now and your home is looking a little cluttered and unorganized. Some rooms look bare without the Christmas tree spilling over with gifts and other holiday keepsakes, while other rooms are strewn with boxes, wrapping paper, unneeded gifts, clothes and toys that are the wrong size or not the recipient's taste. Much of the rest of the house has become disorganized and cluttered due to the frantic pace of the holidays and excessive amount of purchases being brought into the house. It's no wonder January has been named National Organizational Month!
Hopefully by now, you have done an overall pick-up of your household, throwing out all unwanted food, wrapping paper, broken items and broken down boxes to be recycled. Post-Christmas is also a good time to follow the "one in, one out" rule.....for each new toy or article of clothing received, donate one to a local charity. This step should make a good sized dent in the clutter around your household - with a large bag of trash and another bag or two of gently used toys and clothing and possibly an unneeded gift or two.
Step #1 Select a Space to Organize
If one of your goals this year is to get more organized, now is a great time to begin this task. Once you have completed the initial clean up discussed above, pick a small area that is a complete disaster to organize and declutter. Predetermine how much time you have to work on the project so you do not pick a project too large to complete, leaving you feeling overwhelmed. Choose a crowded pantry or linen closet, NOT an entire kitchen. Doing so will give you a feeling of empowerment, motivating you to continue throughout the house.
Step #2 Determine how you want the space to function.
Whether you are designing a new space or reorganizing an existing space the first thing you need to determine is how you want to use the space and how it needs to function for you and your family. The bathroom closet, pictured below, needed to function as storage for personal care items for two brothers, as well as general care items for the family.
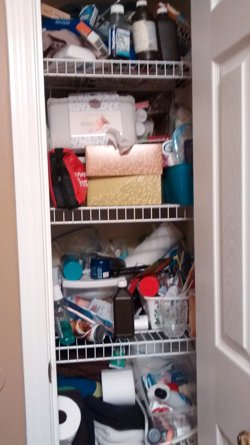 BEFORE
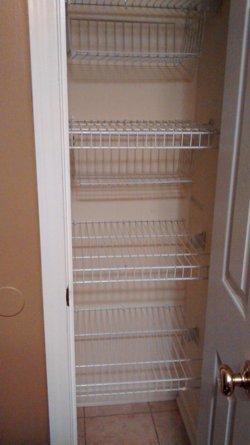
Step #3 Take EVERYTHING out of the space. You cannot clean and organize your space if you do not know everything that is in the space. After removing everything, wipe down the space and any items that are dusty/soiled. See above.

Step #4 Sort. Organize your items into 4 piles: Trash-things that are broken or expired. Also trash any bulky packaging to streamline open storage. Donate-items that are in good shape, but not used frequently. Relocate-items that are used, but do not support the function determined for the space. Keep-items that support the function of the space.
Step #5 Organize "Keep" Items.
Utilize fewer, larger storage containers for a neater look. Hang wire bins from shelves to create extra storage. Place smaller containers within the larger ones to sort further, if necessary. For example I placed a small container in the Oral Care Basket where the boys put their toothbrushes and small tubes of toothpaste. Group "like items" together, and place containers with seldomly used items on higher shelves, with items that are used daily within easy reach. The container with cold and flu medicines, which are rarely used, was placed on the top shelf, whereas the oral care products and band aids were placed front and center on an easy to reach shelf.
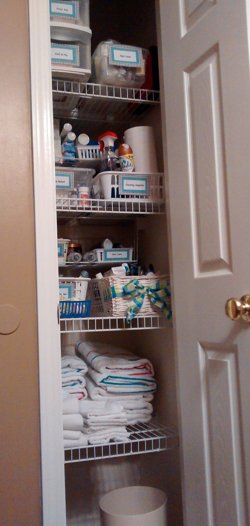 AFTER
AFTER
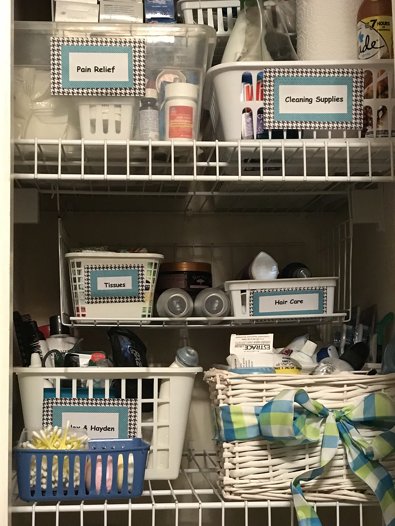
Step #6 Label, Label Label! Labeling each storage container makes it easy for everyone to know exactly where everything is. This makes it easier to find things and put things back where they belong. I used a trendy black houndstooth paper with a teal accent for the labels, a great finishing touch with unisex appeal that didn't cost a cent! The homeowner is a crafter and had paper on hand for the asking, and the tags really give the closet a finished look.
Organizing and decluttering your space does not have to be overwhelming or expensive. All of the items used in this project were either already owned by the homeowner or purchased at the dollar store. I chose plastic containers that were easy to wipe down for the boys. There are all kinds of books and websites which cater to people looking for tips on organizing if you just need a little help and can do it yourself. If the job seems overwhelming, consider enlisting the help of a professional organizer who can help you break the project into manageable pieces and make decisions about paring down belongings. Regardless of the direction you take, I wish you luck...and a 2018 filled with friends, family and a home that you love!